感谢 android-context
概述
本文中涉及的源码分析都是基于 Android 27
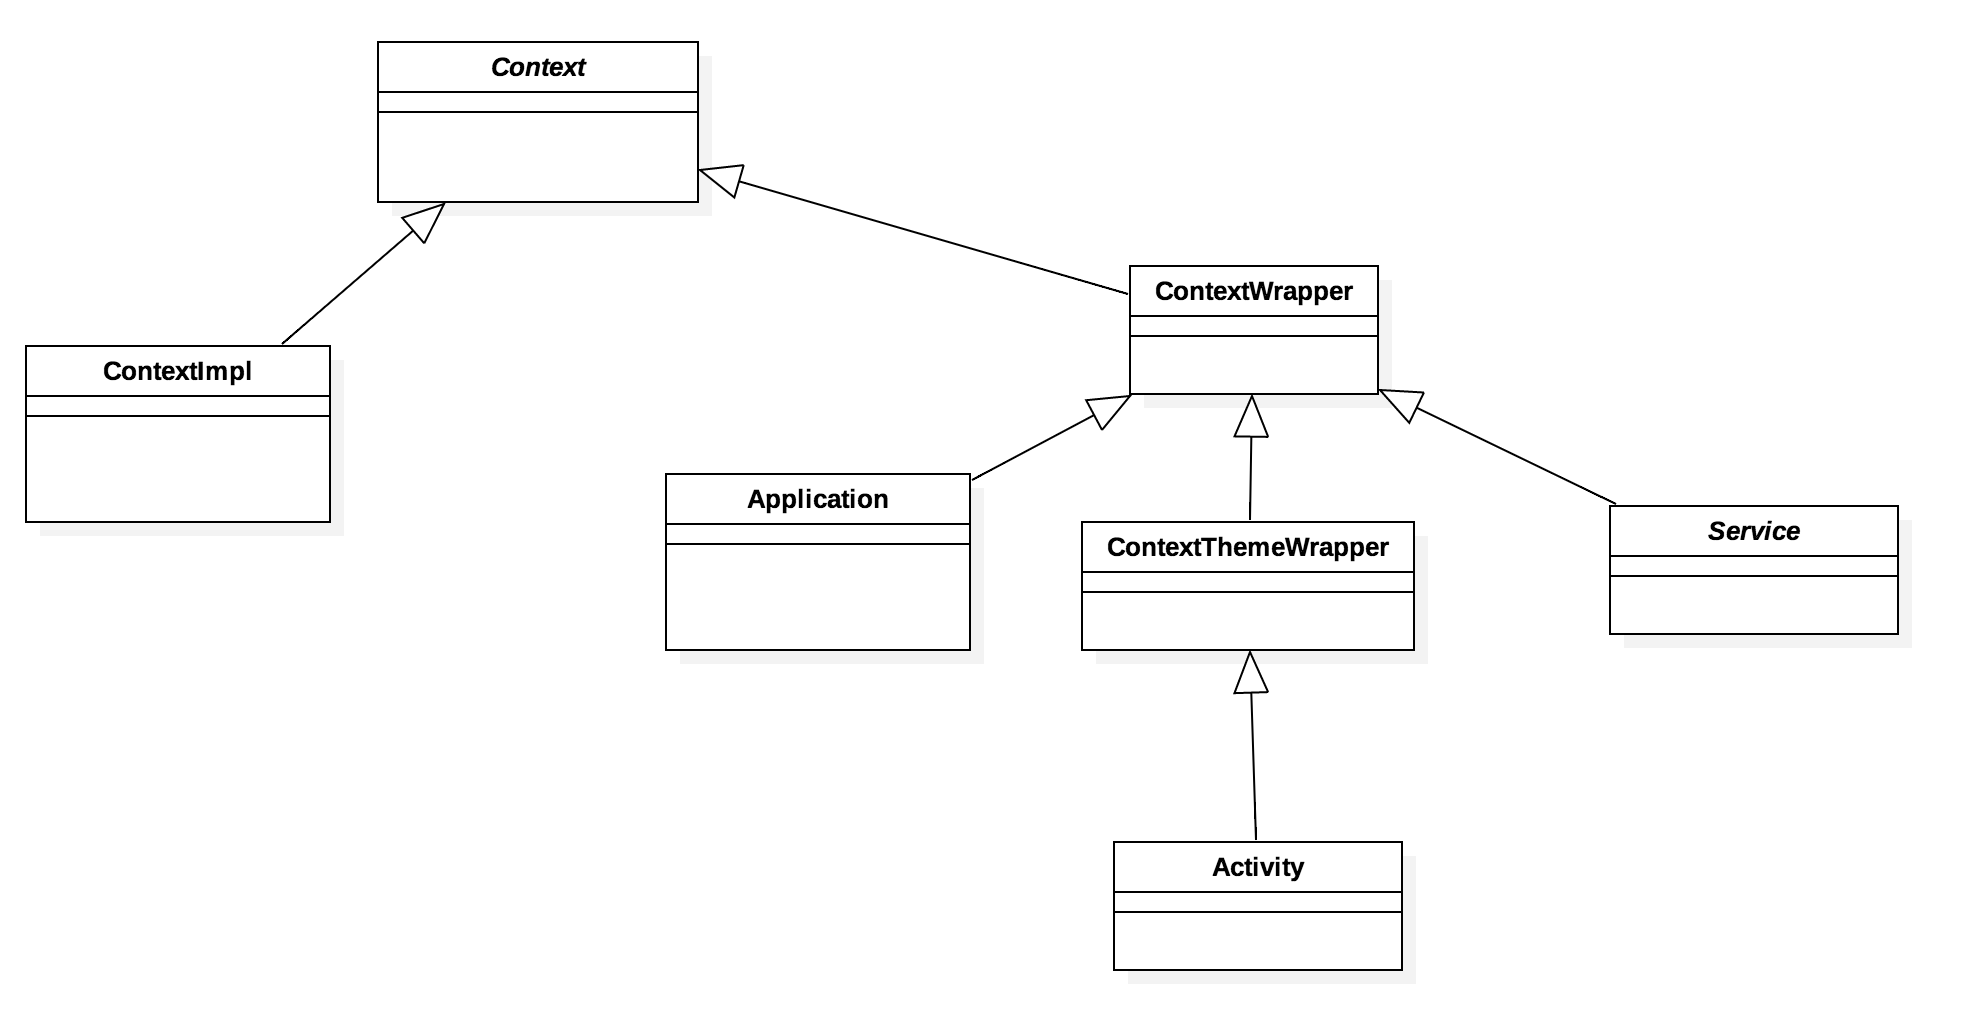
Context 又叫上下文,用于提供应用环境的信息。常用的操作包括启动 Activity、Service,或者通过 getResources() 返回 Resources 用于获取应用的资源文件,比如字符串、Drawable 等等。对于这些用法,我们就不去一一列举了,这篇文章的最终目的是,通过对 Context 体系的整体了解,能在平时的应用开发中,正确使用不同类型的 Context。首先我们看下 Context 的类图:
其中 ContextImpl 负责 Context 核心功能的实现,而我们常见的 Activity Context,Application Context 等则是继承于 ContextWrapper,从类名可以猜测,这个是 Context 的包装类。实际上也是如此:
1
2
3
4
5
6
7
8
public ContextWrapper (Context base) { mBase = base; } @Override public void startActivity (Intent intent) { mBase.startActivity(intent); }
通过在构造函数中将 ContextImpl 实例赋值给 mBase,然后在比如 startActivity 等方法实现中,将调用转发给 mBase,至于 mBase 是不是 ContextImpl 实例,这个在后面的源码分析中可以知道。
通过上面的类图,我们可以知道 Application、Service、Activity 都是继承于 ContextWrapper,那么接下来通过简单的源码分析下上述的三个类实例的 Context 初始化过程。
Context初始化 Activity 在前面的 Activity 启动分析 中,我们知道 Activity 启动方法是 ActivityThread.performLaunchActivity()
1
2
3
4
5
6
7
8
9
10
11
12
13
14
15
16
17
18
19
20
21
22
23
24
private void performLaunchActivity () { if (r.packageInfo == null ) { r.packageInfo = getPackageInfo(); } ContextImpl appContext = createBaseContextForActivity(r); Activity activity = null ; try { java.lang.ClassLoader cl = appContext.getClassLoader(); activity = mInstrumentation.newActivity(cl, component.getClassName(), r.intent); } catch (Exception e) { } try { Application app = r.packageInfo.makeApplication(false , mInstrumentation); appContext.setOuterContext(activity); activity.attach(); } catch (Exception e) { } }
首先获取 LoadedApk 实例,接着调用 createBaseContextForActivity() 创建 ContextImpl 实例,之前我们提到 ContextWrapper 是将 Context 核心功能转发给 ContextImpl 实现的,而 ContextWrapper.mBase 的赋值,在 Activity 启动流程中,是通过调用 Activity.attach() 实现,这个我们在后面的分析中可以知道。
create 1 2 3 4 5 6 7 8 9 10 private ComtextImpl createBaseContextForActivity () { final int displayId; try { displayId = ActivityManager.getService().getActivityDisplayId(r.token); } catch (RemoteException e) { } ContextImpl appContext = ContextImpl.createActivityContext(); }
1 2 3 4 5 6 7 8 9 10 11 12 13 14 15 16 17 static ContextImpl createActivityContext () { ContextImpl context = new ContextImpl (); final ResourcesManager resourcesManager = ResourcesManager.getInstance(); context.setResources(resourcesManager.createBaseActivityResources(activityToken, packageInfo.getResDir(), splitDirs, packageInfo.getOverlayDirs(), packageInfo.getApplicationInfo().sharedLibraryFiles, displayId, overrideConfiguration, compatInfo, classLoader)); context.mDisplay = resourcesManager.getAdjustedDisplay(displayId, context.getResources()); }
attach 1 2 3 final void attach () { attachBaseContext(context); }
1 2 3 protected void attachBaseContext () { super .attachBaseContext(newBase); }
这个步骤比较简单,最终也是调用 ContextWrapper.attachBaseContext()
Service Service 的创建是在 ActivityThread.handleCreateService()
1 2 3 4 5 6 7 8 9 10 11 12 13 14 15 16 17 18 19 20 21 LoadedApk packageInfo = getPackageInfoNoCheck();Service service = null ;try { java.lang.ClassLoader cl = packageInfo.getClassLoader(); service = (Service) cl.loadClass(data.info.name).newInstance(); } catch (Exception e) { } try { ContextImpl context = ContextImpl.createAppContext(this , packageInfo); context.setOuterContext(service); Application app = packageInfo.makeApplication(false , mInstrumentation); service.attach(); } catch (Exception e) { }
Service 的 Context 初始化流程和 Activity 是差不多,相同的 LoadedApk -> ContextImpl -> attach
create 1 2 3 4 5 6 static ContextImpl createAppContext () { ContextImpl context = new ContextImpl (); context.setResources(packageInfo.getResources()); return context; }
attach 1 2 3 public final void attach () { attachBaseContext(context); }
Service 的 attach 和 Activity 相同,都是调用 ContextWrapper.attachBaseContext()
Application Application 的创建是在 LoadedApk.makeApplication()
1 2 3 4 5 6 7 8 9 10 11 12 13 14 15 16 17 18 19 20 21 22 23 24 25 26 27 public Application makeApplication () { if (mApplication != null ) { return mApplication; } Application app = null ; String appClass = mApplicationInfo.className; if (forceDefaultAppClass || (appClass == null )) { appClass = "android.app.Application" ; } try { java.lang.ClassLoader cl = getClassLoader(); if (!mPackageName.equals("android" )) { initializeJavaContextClassLoader(); } ContextImpl appContext = ContextImpl.createAppContext(mActivityThread, this ); app = mActivityThread.mInstrumentation.newApplication( cl, appClass, appContext); appContext.setOuterContext(app); } catch (Exception e) { } }
咋一看好像 Application 的流程和其他两个不太相同,其实 Application 的 attach 是在 Instrumentation.newApplication()
create 1 2 3 4 static ContextImpl createAppContext () { ContextImpl context = new ContextImpl (); context.setResources(packageInfo.getResources()); }
attach 1 2 3 4 5 6 public static Application newApplication () { Application app = (Application)clazz.newInstance(); app.attach(context); return app; }
1 2 3 4 final void attach () { attachBaseContext(context); mLoadedApk = ContextImpl.getImpl(context).mPackageInfo; }
小结 Activity、Service、Application 的 Context 初始化流程大致是这样,首先创建 ContextImpl 实例,接着调用 ContextWrapper.attachBaseContext() 赋值给 mBase,ContextImpl 用于实现 Context 的核心功能,而 Context 的继承类则增加差异性功能。
实践 通过上面对不同类型的 Context 的初始化分析,我们对 Context 机制有个大概的认识,接下来我们通过对实际场景下的不同 Context 用例进行分析,从而加深对 Context 的理解。
View Context 问题 我们知道可以通过调用 View.getContext() 返回当前 View 使用的 Context 实例,这个实例主要用于获取 View 所要使用的资源信息,那么这个 Context 实例是在什么时候赋值的,使用的是哪种类型的 Context,区别又是什么呢。
分析 首先我们对 View 的 mContext 变量赋值进行搜索,可以知道,赋值操作是在其中一个构造函数中,同时其他构造函数都会调用这个构造函数,所以我们可以先从构造函数的调用入手。
如果我们想要动态从 xml 布局中解析得到 View,我们会通过 LayoutInflater 去实现:
1 2 LayoutInflater layoutInflater = LayoutInflater.from(context);View view = layoutInflater.inflate(R.layout.xxx,null );
首先我们看下 LayoutInflater.from():
1 2 3 4 5 6 7 public static LayoutInflater from (Context context) {LayoutInflater LayoutInflater = (LayoutInflater)context.getSystemService(Context.LAYOUT_INFLATER_SERVICE); if (LayoutInflater == null ) { throw new AssertionError ("LayoutInflater not found." ); } return LayoutInflater; }
在前面,我们提到 Context 的核心方法都转发给 mBase 即 ContextImpl 实例,所以看下 ContextImpl 类的实现:
1 2 3 4 5 6 7 8 public Object getSystemService (String name) { return SystemServiceRegistry.getSystemService(this , name); } public static Object getSystemService (ContextImpl ctx, String name) { ServiceFetcher<?> fetcher = SYSTEM_SERVICE_FETCHERS.get(name); return fetcher != null ? fetcher.getService(ctx) : null ; }
可以看到最终的调用都转发给了 ServiceFetcher,而 SYSTEM_SERVICE_FETCHERS 则是存储着各个类型的 Fetcher 的实例
1 2 3 4 5 6 7 8 9 10 11 12 private static final HashMap<String, ServiceFetcher<?>> SYSTEM_SERVICE_FETCHERS = new HashMap <String, ServiceFetcher<?>>(); private static final HashMap<Class<?>, String> SYSTEM_SERVICE_NAMES = new HashMap <Class<?>, String>(); private static <T> void registerService (String serviceName, Class<T> serviceClass, ServiceFetcher<T> serviceFetcher) { SYSTEM_SERVICE_NAMES.put(serviceClass, serviceName); SYSTEM_SERVICE_FETCHERS.put(serviceName, serviceFetcher); }
SYSTEM_SERVICE_FETCHERS 存储着 Service 名称和 Fetcher 的映射关系,而这种关系的注册是通过 registerService(),这里我们只关心 LayoutInflater 的注册:
1 2 3 4 5 6 registerService(Context.LAYOUT_INFLATER_SERVICE, LayoutInflater.class, new CachedServiceFetcher <LayoutInflater>() { @Override public LayoutInflater createService (ContextImpl ctx) { return new PhoneLayoutInflater (ctx.getOuterContext()); }});
LayoutInflater 的实现类是 PhoneLayoutInflater,同时 Fetcher 的实现类是 CachedServiceFetcher,PhoneLayoutInflater 只是简单的继承 LayoutInflater,核心代码都在 LayoutInflater,有兴趣的同学可以去看下,所以我们就看下 CachedServiceFetcher.getService()
1 2 3 4 5 6 7 8 9 10 11 12 13 14 15 public final T getService (ContextImpl ctx) { final Object[] cache = ctx.mServiceCache; synchronized (cache) { Object service = cache[mCacheIndex]; if (service == null ) { try { service = createService(ctx); cache[mCacheIndex] = service; } catch (ServiceNotFoundException e) { } } return (T)service; } }
注意到,Service 的缓存是存储在 ContextImpl.mServiceCache 并且该字段不是静态的,即Service 的缓存是针对于相同的 Context 实例的 ,如果不存在缓存,那么调用 createService(),上文我们分析 LayoutInflater Fetcher 时知道会创建 PhoneLayoutInflater 实例:
1 2 return new PhoneLayoutInflater (ctx.getOuterContext());
而 PhoneLayoutInflater 的构造函数也是调用超类的构造函数:
1 2 3 4 protected LayoutInflater (Context context) { mContext = context; }
接下来我们看下 inflate() 源码:
1 2 3 4 5 6 7 8 9 public View inflate (@LayoutRes int resource, @Nullable ViewGroup root, boolean attachToRoot) { final Resources res = getContext().getResources(); final XmlResourceParser parser = res.getLayout(resource); try { return inflate(parser, root, attachToRoot); } finally { parser.close(); } }
1 2 3 4 5 6 7 8 9 10 11 12 13 14 15 16 17 18 19 20 21 22 23 24 public View inflate (XmlPullParser parser, @Nullable ViewGroup root, boolean attachToRoot) { synchronized (mConstructorArgs) { final Context inflaterContext = mContext; final AttributeSet attrs = Xml.asAttributeSet(parser); Context lastContext = (Context) mConstructorArgs[0 ]; mConstructorArgs[0 ] = inflaterContext; View result = root; try { final View temp = createViewFromTag(root, name, inflaterContext, attrs); } catch () { } finally { mConstructorArgs[0 ] = lastContext; mConstructorArgs[1 ] = null ; } return result; } }
inflater() 就是对 xml 布局进行解析,接着实例化 View,这里我们不去关心它的解析流程,这一块内容可以单独写成一篇文章,我们主要看的是 createViewFromTag() 它是根据标签名称去实例化具体的 View 实例
1 2 3 4 5 6 7 8 9 10 11 12 13 14 15 16 17 18 19 20 21 22 23 24 25 26 27 28 29 30 31 32 33 34 35 36 37 38 39 40 41 42 43 44 45 46 47 48 49 50 51 52 53 54 55 56 57 View createViewFromTag (View parent, String name, Context context, AttributeSet attrs, boolean ignoreThemeAttr) { if (name.equals("view" )) { name = attrs.getAttributeValue(null , "class" ); } if (!ignoreThemeAttr) { final TypedArray ta = context.obtainStyledAttributes(attrs, ATTRS_THEME); final int themeResId = ta.getResourceId(0 , 0 ); if (themeResId != 0 ) { context = new ContextThemeWrapper (context, themeResId); } ta.recycle(); } try { View view; if (mFactory2 != null ) { view = mFactory2.onCreateView(parent, name, context, attrs); } else if (mFactory != null ) { view = mFactory.onCreateView(name, context, attrs); } else { view = null ; } if (view == null && mPrivateFactory != null ) { view = mPrivateFactory.onCreateView(parent, name, context, attrs); } if (view == null ) { final Object lastContext = mConstructorArgs[0 ]; mConstructorArgs[0 ] = context; try { if (-1 == name.indexOf('.' )) { view = onCreateView(parent, name, attrs); } else { view = createView(name, null , attrs); } } finally { mConstructorArgs[0 ] = lastContext; } } return view; } catch () { } }
不管是系统控件或者自定义控件,最终创建 View 实例都会调用到 createView()
1 2 3 4 5 6 7 8 9 10 11 12 13 14 15 16 17 18 19 20 21 22 23 24 25 26 27 28 29 30 31 32 33 34 35 36 37 38 39 40 41 42 43 44 45 46 47 48 49 50 51 52 53 54 55 56 57 58 59 60 61 62 63 64 65 public final View createView (String name, String prefix, AttributeSet attrs) { Constructor<? extends View > constructor = sConstructorMap.get(name); if (constructor != null && !verifyClassLoader(constructor)){ constructor = null ; sConstructorMap.remove(name); } Class<? extends View > clazz = null ; try { if (constructor == null ) { clazz = mContext.getClassLoader().loadClass( prefix != null ? (prefix + name) : name).asSubclass(View.class); if (mFilter != null && clazz != null ) { boolean allowed = mFilter.onLoadClass(clazz); if (!allowed) { failNotAllowed(name, prefix, attrs); } } constructor = clazz.getConstructor(mConstructorSignature); constructor.setAccessible(true ); sConstructorMap.put(name, constructor); } else { if (mFilter != null ) { Boolean allowedState = mFilterMap.get(name); if (allowedState == null ) { clazz = mContext.getClassLoader().loadClass( prefix != null ? (prefix + name) : name).asSubclass(View.class); boolean allowed = clazz != null && mFilter.onLoadClass(clazz); mFilterMap.put(name, allowed); if (!allowed) { failNotAllowed(name, prefix, attrs); } } else if (allowedState.equals(Boolean.FALSE)) { failNotAllowed(name, prefix, attrs); } } } Object lastContext = mConstructorArgs[0 ]; if (mConstructorArgs[0 ] == null ) { mConstructorArgs[0 ] = mContext; } Object[] args = mConstructorArgs; args[1 ] = attrs; final View view = constructor.newInstance(args); if (view instanceof ViewStub) { final ViewStub viewStub = (ViewStub) view; viewStub.setLayoutInflater(cloneInContext((Context) args[0 ])); } mConstructorArgs[0 ] = lastContext; return view; } catech () { } }
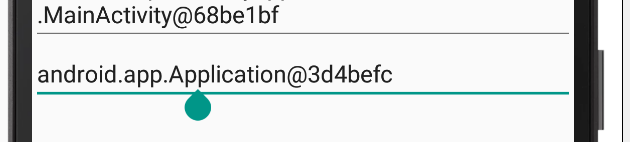
最后一个问题,Application Context 和 Activity Context 用在 View Context 中有什么不同的地方,我们先通过一个例子来看下效果:
1 2 3 4 5 6 7 8 9 10 11 12 13 14 15 16 17 18 19 protected void onCreate (Bundle savedInstanceState) { addEditText(this ); addEditText(getApplicationContext()); } private void addEditText (@Nullable Context context) { if (mRootLayout == null ) { return ; } if (context == null ) { return ; } EditText editText = new EditText (context); mRootLayout.addView(editText); editText.setText(context.toString()); }
代码很简单,使用不同 Context 去创建 EditText 实例,同时我们在 AndroidManifest 中应用了主题
1 2 3 4 5 6 <Applicatin android:theme ="@style/AppTheme" > </Applicatin > <item name ="colorAccent" > @color/colorAccent</item > <color name ="colorAccent" > #FF4081</color >
我们发现使用 Activity Context 的 EditText 使用了 theme 中的配置,回顾我们最开始的 Context 类图,Activity 是继承于 ContextThemeWrapper,而 Application 则是继承于 ContextWrapper,那我们是不是可以猜测只有 ContextThemeWrapper 的继承类才会读取 theme 中配置信息呢?我们可以看下 ContextThemeWrapper 中跟 theme 相关的方法:
1 2 3 4 5 6 7 8 9 10 11 12 13 14 15 16 17 18 19 20 21 22 23 24 25 26 public Resources.Theme getTheme () { if (mTheme != null ) { return mTheme; } if (mThemeResource == 0 ) { mThemeResource = R.style.Theme_AppCompat_Light; } initializeTheme(); return mTheme; } private void initializeTheme () { final boolean first = mTheme == null ; if (first) { mTheme = getResources().newTheme(); Resources.Theme theme = getBaseContext().getTheme(); if (theme != null ) { mTheme.setTo(theme); } } onApplyThemeResource(mTheme, mThemeResource, first); } protected void onApplyThemeResource (Resources.Theme theme, int resid, boolean first) { theme.applyStyle(resid, true ); }
mTheme 和 mThemeResource 都可以通过构造方法和 set 方法进行赋值,假设没有给 mTheme 赋值,只给 mThemeResource 赋值,那么上面的代码将 mThemeSource 应用到 ContextWrapper.getTheme() 返回的 Theme 实例,从而获取新的 Theme 实例。Activity 的启动流程是在 ActivityThread.performLaunchActivity() 中,其中涉及 Theme 的赋值是:
1 2 3 4 int theme = r.activityInfo.getThemeResource();if (theme != 0 ) { activity.setTheme(theme); }
现在我们应该知道了为什么有时候控件的样式不跟随主题设置了。
小结 通过上面的源码分析,我们可以知道:
当使用 LayoutInflater 从 xml 文件中 inflate 布局时,调用的是 View(Context,AttributeSet) 构造函数,使用的 Context 实例跟 LayoutInflater 创建时使用的 Context 一样,并且 LayoutInflater 会缓存在 Context 实例中,即相同的 Context 实例多次调用会获取一样的 LayoutInflater 实例。
Activity Context 会读取 Theme 的样式信息,而 Application Context 则不会。
getApplication()和getApplicatinContext() 接下来的分析参考于 android-context
绝大数情况下,这两个方法的返回值是一样。
getApplicationContext() 的存在是 Android 历史原因,getApplication() 这个只存在 Activity 和 Service 类中,那么对于 BroadcastReceiver 和 ContentProvider 来说,要获取 Application,就只能通过 getApplicationContext()。
两者对比:
对于 Activity/Service 来说,这两个方法没有区别,除非厂商修改过
BroadcastReceiver 只能通过 getApplicationContext() 获取 Application 实例
ContentProvider 也只能通过 getApplicationContext() 获取 Application 实例,但有可能出现空值的情况。当同个进程有多个 apk 的情况下,对于第二个 apk 是由 provider 方式拉起,而 provider 创建过程中并不会初始化 Application,此时调用 getApplicationContext() 则会返回空。
小结 绝大数情况下,getApplication() 和 getApplicationContext() 返回是一样的,但如果不是特别熟悉,最好对 getApplicationContext() 进行空值判断。
Dialog Context 我们都知道创建 Dialog 实例需要传递 Context 实例,但这里的 Context 必须是 Activity Context,如果传入其他类型的 Context,则会抛出以下异常:
1 Caused by: android.view.WindowManager$BadTokenException: Unable to add window -- token null is not valid; is your activity running?
start Activity 通过调用 startActivity() 去启动 Activity 是非常常见的操作,并且这个方法存在 Context 类中,即不仅仅是 Activity 可以调用,Application 也可以调用,而 Application 没有重写 startActivity() 即实现是委托给 ContextImpl 的。这里有个需要注意的地方:
在 Android 26 上,如果使用 Application 启动 Activity,而没有添加 Intent.FLAG_ACTIVITY_NEW_TASK 标记的话,则会抛出以下异常:
1 Caused by: android.util.AndroidRuntimeException: Calling startActivity() from outside of an Activity context requires the FLAG_ACTIVITY_NEW_TASK flag. Is this really what you want?
Android 26 上 ContextImpl 的相关代码如下:
1 2 3 4 5 6 7 8 9 public void startActivity (Intent intent, Bundle options) { if ((intent.getFlags()&Intent.FLAG_ACTIVITY_NEW_TASK) == 0 ) { throw new AndroidRuntimeException ( "Calling startActivity() from outside of an Activity " + " context requires the FLAG_ACTIVITY_NEW_TASK flag." + " Is this really what you want?" ); } }
只要没有添加 Intent.FLAG_ACTIVITY_NEW_TASK 标记就会抛异常。
而在 Android 27 上,则有些区别,同样是 ContextImpl 的源码:
1 2 3 4 5 6 7 8 9 public void startActivity (Intent intent, Bundle options) { if ((intent.getFlags()&Intent.FLAG_ACTIVITY_NEW_TASK) == 0 && options != null && ActivityOptions.fromBundle(options).getLaunchTaskId() == -1 ) { throw new AndroidRuntimeException ( "Calling startActivity() from outside of an Activity " + " context requires the FLAG_ACTIVITY_NEW_TASK flag." + " Is this really what you want?" ); } }
只有在指定了 options 同时其中没有指定 LaunchTaskId 才会抛异常。
总结 上面我们列举了不同 Context 的初始化过程,比如最常见的 Activity Context 和 Application Context,同时对不同 Context 的使用场景进行比较,相信看完文章的同学,对 Context 有了更多的理解。
不管如何谨慎小心,怀着诚惶诚恐的心态写作,但是毕竟作者的水平有限,如果有写的不对的地方,敬请指教,先行感谢。